

How to Use Resistance Bands for Squatting
The squat is the undisputed king of lower body exercises. Many people, though, struggle with barbell squats. Difficulties with form, injury risks, or limited access to equipment can deter even the most determined fitness enthusiasts. But there is another option: resistance bands. In this article, we'll reveal how resistance bands for squatting can revolutionize your squatting routine, making it safer, more efficient, and adaptable to your fitness goals. We’ll also show how bands can be used with barbell squats to take your training to the next level.
Understanding Resistance Bands
Resistance bands are stretchable tools used to add resistance to exercises. They are usually constructed from latex or rubber and come in a range of resistance levels and sizes. The three main types of resistance bands are:
- Loop Bands: These are continuous, closed-loop bands that can be used for a wide range of exercises, including squats.
- Tube Bands: These bands have handles on either end and are versatile for both upper and lower-body workouts.
- Flat Bands: These are thin, flat strips of resistance material often used for physical therapy and rehabilitation exercises.
Benefits and Applications of Resistance Band Squats
- Variable Resistance: As you stretch the band during your exercise, the level of resistance increases progressively. Unlike traditional free weights or bodyweight exercises, where the resistance remains constant throughout the movement, resistance bands adapt to your strength curve. This feature continuously activates your muscles, promoting muscle growth and strength development.
- Emphasis on the Eccentric Phase: The eccentric, or lowering, phase of a lift, which involves the controlled lengthening of a muscle during exercise, is crucial for building muscle and strength. Resistance band training encourages a slower and more controlled descent during exercises like squats. The band naturally resists this lengthening, forcing you to move more slowly and deliberately during the eccentric phase.
- Explosive Concentric Phase: While a resistance band workout encourages a deliberate eccentric phase, it also allows for an explosive concentric phase (the upward motion). Once the band has adequate tension, you can explode upward, emphasizing power and speed during the lifting phase.
Unlike traditional barbell squats, where safety concerns may limit explosiveness, resistance bands are designed for explosive concentric movements, adding a dynamic element to your workouts.
- Beginner-Friendly: Resistance band exercises are an excellent option for beginners. Compared to the technical aspects of barbell squats, resistance band squats are easier to learn and execute correctly. You can focus on perfecting your squatting form without the added complexity of holding onto a barbell. The bands also encourage proper squat mechanics by emphasizing the use of your heels, helping you avoid leaning forward onto your toes.
- Ideal for Rehabilitation: If you're recovering from an injury or dealing with joint issues, resistance band squats offer a safe and effective way to rebuild strength. They are gentle on your joints and provide an opportunity to strengthen the stabilizer muscles around your joints, enhancing stability and promoting recovery.
Major Muscles Activated During Resistance Band Squats
Resistance band squats are a compound exercise that involves multiple muscle groups in your lower body and core. These muscles work together to stabilize and perform the squatting motion. Here are the major muscles worked during resistance band squats:
- Quadriceps: The quads are the main muscles used to extend your knee joint. They enable you to straighten your leg as you get up from the bottom squat position.
- Gluteus Maximus: The gluteus maximus extends the hip to help you stand up from a squat position. It is the largest muscle in your body, providing the power of the upward drive.
- Hamstrings: The hamstrings enable knee flexion and hip extension. They help control the lowering phase as you bend your knees and maintain balance throughout the exercise.
- Adductors: The adductors are a group of muscles on the inner thighs. They work to stabilize your legs and hips during the squatting motion, preventing your knees from collapsing inward.
How Do You Set Up Resistance Bands for Squats?
- Using an Anchor Point (such as a door): Anchor one end of the resistance band firmly to a floor-level stable point, such as under a closed door, a wall-mounted anchor, or an anchor point that was specifically built for this purpose. Stand three feet in front of the anchor point, facing away from it. Hold the other end of the band at shoulder level with an overhand grip.
- Under Your Feet: Place the band under your mid feet and stand with feet hip-width apart. Hold the other end of the band with an overhand grip either at chest or shoulder level.
- Encircling Your Neck: Attach one end of the resistance band to either of the anchor points already mentioned. The other end of the band should be wrapped around your neck. This will create more tension on the band than is held at chest or shoulder level.
Proper Technique for Resistance Band Squats
Performing a resistance band squat with proper technique is essential for maximizing its effectiveness and safety. Here are step-by-step instructions for executing a resistance band squat using a loop band:
- Begin by stepping onto the middle of the loop resistance band with both feet, making sure the band is evenly positioned under the arches of your feet. Your feet should be shoulder-width apart and angled slightly outward.
- Take the other end of the band and hold it with both hands, bringing it up to your chest level with your palms facing outward. The band should be taut in this start position.
- Begin the squat by taking a deep breath. Now push your hips back and bend your knees, just as if you were sitting back into a chair. Maintain a natural lower back arch (no rounding), and keep your chest up as you go into the squat. Keep your hands against your chest at all times and look directly in front of you.
- Go down until your quads are parallel to the floor or slightly lower if you are comfortable with a lower descent.
- Breathe out as you push your heels into the floor to begin the ascent. Follow through by squeezing the glutes as you extend the hips and knees to return to a standing position. Stop just short of a standing position to keep tension on the quads.
Common Mistakes to Avoid:
- Do not allow your knees to collapse inward; actively push them outward to engage your hip muscles.
- Do not round your back; keep it in a neutral position.
- Maintain control throughout the movement, avoiding jerky or rushed motions.
Variations of Resistance Band Squats
Different variations of the resistance band squat will emphasize specific muscles more than others. The main difference between each of these versions is foot placement and band position. Here are three variations of the banded squat that you can add to your workout program to hit your lower body from every angle.
Banded Sumo Squat:
- Target Muscles: Inner Thighs (Adductors), Quadriceps, Glutes, Hamstrings.
Step-by-Step Instructions:
- Place a resistance loop band under your mid feet. Now stand with your feet wider than shoulder-width apart, toes pointing slightly outward. Hold the other end of the band at chest level with an overhand grip.
- Engage your core, maintain an upright posture, and squat down, pushing your knees outward against the band's resistance. Squat to a parallel thigh position.
- Push through your heels and squeeze your glutes to push back to the upright position.
Banded Squat Jumps:
- Target Muscles: Quadriceps, Glutes, Hamstrings, Calves. Step-by-Step Instructions:
Step-by-Step Instructions
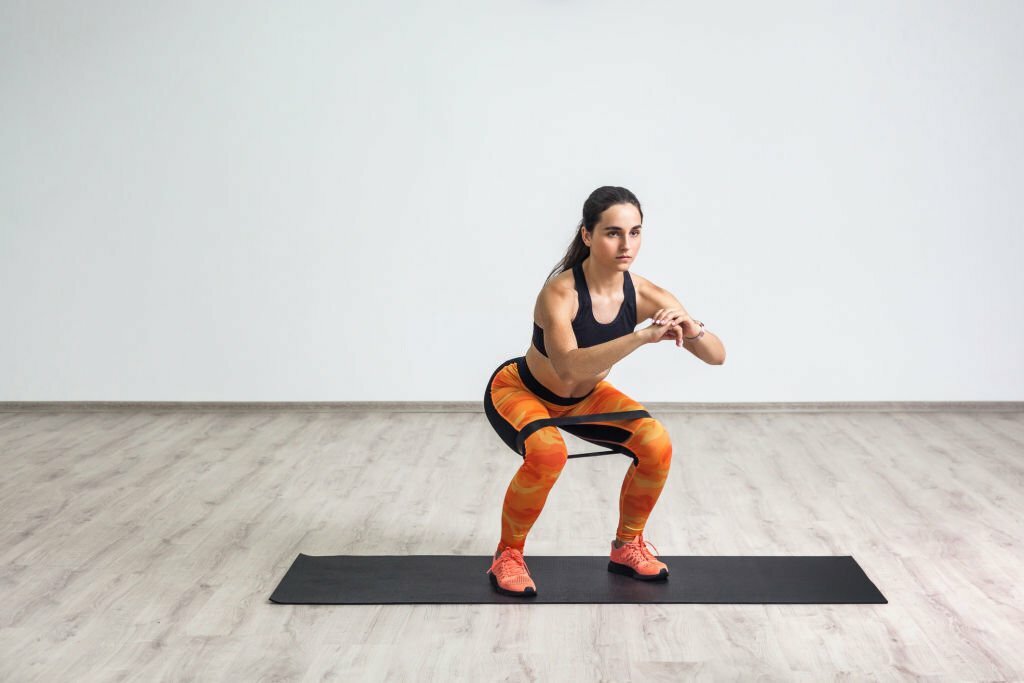
- Place a mini resistance loop band around your thighs, just above your knees.
- Stand with your feet hip-width apart. Lower into a squat position, keeping your chest up and knees aligned with your toes.
- Explosively jump straight up while driving your knees outward against the band.
- Land softly in a squat position and immediately jump again.
Banded Squat Walks:
- Target Muscles: Glutes, Quadriceps, Abductors, Calves.
Step-by-Step Instructions:
- Place a mini resistance loop band around your thighs, just above your knees. Stand with your feet hip-width apart.
- Bend your knees slightly and maintain a slight squat position. Take small steps to the side while keeping tension on the band.
- Continue walking sideways for a set distance or a specific number of steps. Reverse the direction and walk in the opposite direction to work both sides equally.
Other resistance band squat variations are the Bulgarian split squat, overhead squat , lateral split squats, goblet squats and Zercher squat.
Adding Bands to Barbell Squats
When you combine resistance bands with the traditional barbell squat, you unlock a new level of power and explosiveness while overcoming the limitations of strength curves. However, you can’t use any old band for this type of training.
You'll want 41-inch loop resistance bands, often referred to as power bands. These bands are specially designed to complement barbell exercises.
To understand the benefits of adding bands to barbell squats, we need to understand the concept of strength curves. Different exercises have ascending, bell-shaped, or descending strength curves based on the muscle tension during each repetition. Bands can enhance exercises with ascending strength curves by providing consistent resistance throughout the movement. With barbell squats, bands add resistance where it's needed most—at the top of the lift—ensuring even strength development across the entire range of motion.
Banded squats can also enhance stability training. Looping a weighted plate through the bands and hanging them on both sides of the barbell strengthens stabilizer muscles, improving your stability and strength during heavy lifts.
How to do barbell squats with resistance bands
- Perform your squats in a power rack, ideally one with band pegs on the frame base.
- Loop a band over the bottom of the frame (or on the pegs) and the other end on the weight bar. We recommend starting with just a 45 lb bar and bands to get used to the feel and resistance of the movement.
- Balance is key, so ensure the bands are evenly distributed on both sides of the barbell to prevent uneven workouts. Now perform barbell squats as you normally would.
Conclusion
Resistance bands and squats make an ideal combination for anyone wanting to safely and effectively work their lower body. For just a few bucks, they allow you to do every squat variation with a variable resistance that uniquely works your quads, glutes, and hamstrings.
Unlock even more strength training power by combining resistance bands with barbell squats. Doing so allows you to overcome strength curve limitations to place constant tension on your quads. Why not give them a try – they’ll add a whole new dimension to leg day!